
The shutter
The shutter is one of the two things that controls how much light that hits the film (the other thing is the aperture). The shutter simply regulates exposure time -- for how long the film will be exposed to light. The shutter consists of several "curtains". When you press the shutter release button, one set of curtains will open, letting light in. After a certain time another set of curtains will close, cutting off the light supply. When the film is wound, both sets will be reset to their starting positions. This is called "cocking the shutter".
Creative use of the shutter
With a short (fast) shutter speed, you can freeze an event -- such as a hummingbird flapping its wings, or a sprinter passing the finish line. On the other hand, using a longer (slow) shutter speed, the hummingbird's wings will be allowed to move while the film is exposed, showing the movement. Or you may use panning on the sprinter -- this is the technique of following a moving object with the lens, creating a (hopefully) sharp main subject but a background with motion blur. What you want to do is up to your photographic vision.
Setting different shutter speeds
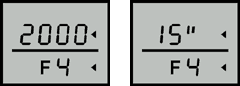
To adjust the shutter speed on the 9000, use the lever just above the "9000" logotype on the camera. It is conveniently located near your index finger when holding the camera normally. Pressing the lever to the left will decrease the shutter speed, pressing it to the right will increase it. The setting changes rapidly if the button is held in one direction. Note that the shutter speed is expressed as "parts of a second". In other words, the value "2000" in the display means "1/2000 of a second". Speeds one second and longer are indicated with a quotation mark after the number; 15" means fifteen seconds.
Camera shake
With longer shutter speeds, you may experience camera shake. This is when the shutter is open for so long that your own body will affect sharpness by moving the camera slightly during exposure. The effect will be seen more easily with longer lenses. This can partly be avoided with proper technique or some kind of support. To give tips about technique is somewhat beyond the scope of this web site, but there is an old rule: never use a shutter speed slower than 1/F, where F is the focal length of your lens. That means that if you use a 300mm lens, your shutter speed should be shorter than 1/300. This is of course a really rough rule, as camera shake is affected by lots of variables, but you should keep it in mind. If you are approaching shutter speeds which you suspect may lead to camera shake, try to find support somewhere. Hold the camera against a tree or a railing or something stationary.
- Never ever touch the shutter curtains! Not with the film tip, not with your fingers, not with anything. The shutter may get permanently damaged!
- The 9000 has the ability to set shutter speeds in both "full stops" steps and stepless (one shutter "stop" corresponds to one stop on the aperture scale). Shutter operation depends on the P/A/S/M mode set:
- P mode: stepless shutter speeds
- A mode: stepless shutter speeds
- S mode: full stops
- M mode: full stops